I imagine you could count the number of wargamers who game in 54mm scale on well,..several hands actually, but really, I'm sure the numbers are small compared to their diminutive 28mm practitioners. It does require a somewhat larger table and a lot more paint. I have to say however the pleasure derived from playing with these giants is enormous. I assume it's something to do with nostalgia and diminishing eyesight but I've really taken a liking to these chaps. There's something quaint and charming about a line of steadfast 54mm warriors marching down a road or defending a stone wall much the same as H.G Well's famous Little Wars lead forefathers did. Crikey!!.. gone a bit sentimental and soppy there..whoa! give yourself a good slap and get to the bloody point.
What I really want to share is my first ACW game of
Sharp Practice V:2 in 54mm scale
As it was our first game both I and my opponent Dave had a bit of a learning curve coping with the interpretation of the rules, in particular the activation and command aspects. The basic stuff like movement, firing and fisticuffs is really very simple and quickly becomes intuitive. I feel that a couple more games will see us up to speed. Certainly the demo clips put out by the Lardies and viewable on Youtube are excellent to get you started. This is my first foray into card based movement and command mechanisms but I am pleasantly surprised how well they works. There a lot of subtle nuances and clever stuff imbedded in these rules that become apparent as the game progresses. I think these rules admirably fill the gap between small scale hardcore skirmish games with a handful of figures and full scale battles with a cast of several hundreds. An average force is around 50 figures plus a few characters and maybe a gun as an optional addition.
I wont inflict a blow by blow account of every dice roll and morale test of the game but will instead share some of the highlights and jolly it along with a narrative which bears just the merest resemblance to what actually happened.
THE BATTLE OF HICKORY CREEK
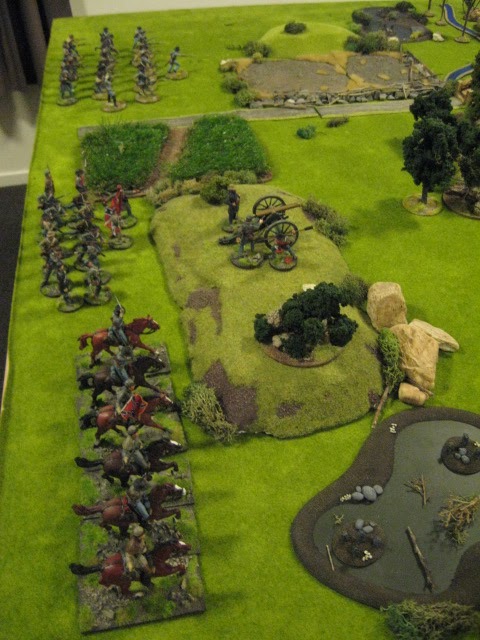
The table looking North:
The battlefield is a relatively flat lanscape interspersed with forests, swampy marshland, fields, stone walls a crossroads and intersected East to West by Hickory Creek, currently at a low ebb due to glorious Summer weather.
We played the encounter scenario with the Union force under Colonel Kinleith (Me) arriving on the Western side and the Rebs under the venerable Colonel Ambose T Scrivener (Dave) arriving from the East.
I tried to make the terrain as even as possible with equal amounts of broken ground, forest, swamp, walls and fences etc. Note the home made garden twig trees bordering the swamp to the East. Cheap and cheerful and made in less than two hours.
Pre Battle Narrative
The story goes that a Union Vanguard is forging ahead to secure a clear passage for the main Army and to make contact with enemy forces. Funnily enough the Rebel commander has the same idea. The scene is set for a punch up.
The forces are not completely by the book and frankly the writers encourage you to mix it up a bit anyway so don't get too hung up on points and other such nonsense. The Lardies prerequisite with these rules is to have fun and encourage a story line which appeals to me a lot. Also we wanted to keep things fairly straight forward till we have a good grasp of the rules. Morale was diced for giving the Union the edge on 10 and the Rebs a rating of 9
Union forces
C in C Colonel Thomas Kinleith
Comprising:
10th Maine: 3 x groups 7 men, 1 x leader &1 x subordinate leader attached.
5th Ohio Coloured Volunteers: 2 x groups x 8 men, 1 x Leader
12th Wisconsin: 8 x skirmishers, 1 x Leader
6th Ohio Artillery: 1 x medium smoothbore field piece.
Confederates
C in C Colonel Ambrose.T.Scrivener
Comprising:
16th Georgia: 3 x 7 men, 1 x Leader
4th Indiana: 2 x 8 men, 1 x Leader
3rd Carolina Cavalry 7 x men, 1 x Leader
20th Alabama Artillery: 1 x Medium smoothbore field piece.
Deployment points were decided by dice rolls and unfortunately the Confederate deployment point was very close to a wood which somewhat hindered deployment. The Union fared better with mostly open country and a lovely smooth road to march straight up the middle. Thankfully it wasn't the swamp to their Right Flank. The game allows you to opt for multiple deployment points and I think I would go for this approach next game.
The Georgians lost no time in advancing to the edge of the wood whilst the Indianans moved round to their right to take up position behind the stone wall to secure a solid defensive position on the flank. Their gun and cavalry struggled forward at a less than hasty pace due to the broken terrain and less than helpful movement dice.
The Union shook out in good order with the Ohians advancing in column up the road, the Maine men moving in open columns up the centre. The Maine leader opted to split off a group from the formation under the command of Lt Robards to secure the stone wall by the crossroads to their front and cover the advance. The artillery galloped forward to get into action asap to support the advance. The Wisconsins spread out in open skirmish order on the left flank.
The Ohians soon came under fire from the Rebels in the treeline to their front taking a number of early casualties and suffering 6 shock points. Fortunately Capt Lewis managed to rally off some shock and with the aid of command cards and got them into position behind a stone wall and formed up ready to return a steady fire.
The Rebs then directed their well aimed volleys towards the large mass of Col Robards Maine troops shredding the packed ranks with deadly fire. The Maine boys took 5 casualties and 7 points of shock, These were spread between the formation and fortunately their morale held but things couldn't continue like this for long.
The Rebs go Wild!
It was at this point that a random action occured due to three conseqeutive command cards being drawn. It fell to the Confederate commander to make a throw on the random event chart. The Rebs clearly had their dander up after witnessing the devastation they had inflicted on the Yankees and the Georgians surged out of the woods a double move whooping and hollering the fearsome Rebel Yell in an uncontrollable charge towards the Maine men.
 |
| One I prepared earlier |
Not ideal as it turned out as this allowed the Ohians behind the wall and the group of Maine troops by the crossroads to unleash crashing volleys which stopped the Georgians in their tracks killing 4 men and inflicting 7 shock. Wisely their Colonel withdrew them to the cover of the woods to regroup.
By now the Union artillery had unlimbered, loaded and and drew a bead on the still deploying Confedearate artillery. Their first round was bang on and two Reb gunners were cut down.
 |
| The unfortunate Alabama artllerists. |
 |
| Trusty Britain's Napoleon smoothbore still going strong. |
Thanks to continuing rubbish movement rolls the Carolinan Cavalry dithered about finally emerging from the wood and setting off at the canter towards the crossroadswith the intention of cutting down the isolated Maine group behind the stone wall and hopefully push on to take out that damned gun.
Both sides seemed content at this point to settle down to trading volleys but the Union had a decided advantage thanks to having the bulk of their troops formed up behind stone walls and a good run of command cards which allowed them to rally off shock points and maximise their firing. The Wisconsins in particular did deadly work ably assisted by their colloured comrades.
 |
| The reluctant Carolina Cavalry |
Yet another telling round from the Union artillery put paid to the unfortunate Alabama Artillerists killing all the gunners. We were both thoroughly enjoying ourselves but time had whizzed by and we decided to call it quits. It was decided that due to the Unions strong position they had scored a minor victory however if they were to secure their objectives this would involve some costly advances across open ground in the teeth of an enemy well dug in and still in pretty good shape.
In conclusion both Dave and I rate the rules highly. They deliver a fun and challenging game with plenty of excitement and some forward planning with your deployment and allocation of command cards can really have a big impact on your performance. You really feel like you're down there on the field with your troops issueing orders and facing the fog of batttle and whiff of powder. Bear in mind we are a long way off being fully up to speed as there is mountains of additional stuff that we can bring into the games such as characters and unit characteristics. I dont think die-hard 'proper' wargamers will appreciate the loss of control caused by random events and the narrative role-play style of the game does not appeal to all tastes as a bit of imagination is required. Hey, war isnt scripted and there are numerous examples of unexpected events completely changing the course of a battle.... there's always chess I suppose.